UITableView の編集モードを利用してデータの削除や並び替えを行う
iOS アプリ開発によく登場する UITableView には編集モードというのがあります。
データの並び替えや削除に便利なためよく使うのですが、毎回使い方を調べてる気がするので記事にまとめてみます。
編集ができる UITableView をつくる

こんな感じの単純なテーブルビューを例にします。
このデータセットは以下のように変数で保持していて、削除や並び替えが発生したら変数のデータも合わせて変更します。
var titles = ["0: Hello", "1: World", "2: Swift", "3: Programming"]
編集モードに切り替えられるようにする
編集ボタンの配置

↑のような編集ボタンは予め用意されており、以下のように使用できます。
override func viewDidLoad() {
    super.viewDidLoad()

    // 編集ボタンを左上に配置
    navigationItem.leftBarButtonItem = editButtonItem()
}
このボタンは押すたびに Edit → Done → Edit → ... と切り替わります。
(日本語環境では「編集」「完了」という名前にローカライズされている)
編集ボタンを押した時の処理
Edit ボタンが押されると、setEditing(_) が呼ばれます。
このタイミングで UITableView を編集モードにしたいので、 tableView の editing プロパティを使って変更します。
override func setEditing(editing: Bool, animated: Bool) {
    super.setEditing(editing, animated: animated)
    tableView.editing = editing
}
データを削除する
削除可能なセルの indexPath を指定
今回はすべての Cell を削除可能としています。
func tableView(tableView: UITableView, canEditRowAtIndexPath indexPath: NSIndexPath) -> Bool {
    return true
}
実際に削除された時の処理を実装する
func tableView(tableView: UITableView, commitEditingStyle editingStyle: UITableViewCellEditingStyle, forRowAtIndexPath indexPath: NSIndexPath) {

    // 先にデータを更新する
    titles.removeAtIndex(indexPath.row)

    // それからテーブルの更新
    tableView.deleteRowsAtIndexPaths([NSIndexPath(forRow: indexPath.row, inSection: 0)],
        withRowAnimation: UITableViewRowAnimation.Fade)
}
ここで、「データの編集」→「テーブルの更新」という順番で処理するのが重要です。 この順番を間違えると以下のようなエラーが出て落ちてしまいます。
reason: 'Invalid update: invalid number of rows in section 0. The number of rows contained in an existing section after the update (4) must be equal to the number of rows contained in that section before the update (4), plus or minus the number of rows inserted or deleted from that section (0 inserted, 1 deleted) and plus or minus the number of rows moved into or out of that section (0 moved in, 0 moved out).'
データを並び替える
並び替え可能なセルの indexPath を指定
今回はすべての Cell を並び替え可能とします。
func tableView(tableView: UITableView, canMoveRowAtIndexPath indexPath: NSIndexPath) -> Bool {
    return true
}
並び替え完了後の処理を実装する
ユーザーが並び替えて指を離したタイミングで以下の delegate が呼ばれます。
func tableView(tableView: UITableView, moveRowAtIndexPath sourceIndexPath: NSIndexPath, toIndexPath destinationIndexPath: NSIndexPath) {
    let targetTitle = titles[sourceIndexPath.row]
    if let index = titles.indexOf(targetTitle) {
        titles.removeAtIndex(index)
        titles.insert(targetTitle, atIndex: destinationIndexPath.row)
    }
}
sourceIndexPath にそのデータの元の位置が、destinationIndexPath に移動先の位置が入ってますので、その情報を元に並び替えを行います。
その他のTips
通常モードではスワイプ削除できないようにする
canEditRowAtIndexPath で指定したセルは、編集モード以外に、セルを左方向へスワイプすることでも削除できます。
しかし、最近流行りの SmartNews のようなタブUI(上にタブが並んだUI)では、横方向のスワイプがバッティングしてしまうためユーザビリティがよろしくありません。
普段はスワイプ削除はさせず、「Edit」ボタンを押されて編集モードになった時のみ削除を可能にするためには、以下のように記述します。
func tableView(tableView: UITableView, editingStyleForRowAtIndexPath indexPath: NSIndexPath) -> UITableViewCellEditingStyle {
    if tableView.editing {
        return UITableViewCellEditingStyle.Delete
    } else {
        return UITableViewCellEditingStyle.None
    }
}
編集モード中もセルをタップできるようにする
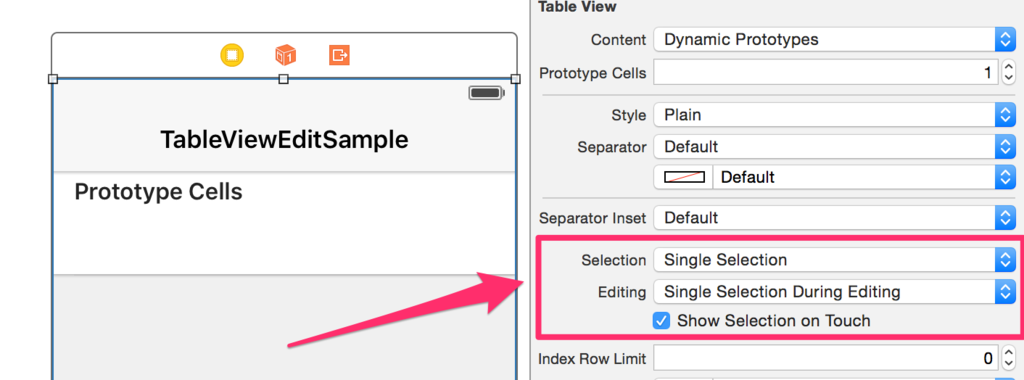
デフォルトでは編集モード中はセルを選択できません。
選択できるようにするには、以下のように記述します。
tableView.allowsSelectionDuringEditing = true
あるいは、 Storyboard 上の下図の項目からも指定できます。

ソースコード
今回使用したサンプルコードは以下にまとめています。
まとめ
簡単に削除や並び替えの UI を作れる UITableView の編集モードについて書きました。
iOS に昔からある機能なのでユーザーの馴染みも深く、使いやすくて良いと思います。

